IO needle insertion should be performed by a physician trained in the technique or by a trained nurse working under the supervision of a physician.
In a CTC, the supplies needed for insertion of an IO needle and staff skilled in the insertion should be available at all times of day or night.
The procedure described in this appendix applies to children from birth (or 3 kg) to less than 40 kg as in a CTC the IO route is primarily used in children
aCitation a.IO insertion is possible in children over 40 kg and adults. Technique and anatomic landmarks are the same but use an adult IO needle (blue, 25 mm, 40 kg and above).
.
6.1 Overview
Indications
An IO access is indicated if a peripheral IV catheter cannot be inserted within 90 seconds in a seriously ill patient.
Contraindications
- Fractured or infected limb
- IO needle insertion in the previous 24 hours in the same site
- Recent surgical procedure near the insertion site
Risks
- Fracture of the bone during insertion
- Growth plate injury
- Dislodging of the IO needle
- Extra medullary infusion with risk of compartment syndrome
- Infection (the risk is minimal if aseptic technique is followed; caution in children with oedematous malnutrition).
Precautions
- Follow aseptic procedure during placement: hand hygiene bCitation b.Wash with soap and water or disinfect with an alcohol-based handrub (ABHR). , disposable equipment, disinfection of the insertion site, etc.
- Limit attempts at placement to one attempt per site.
- Insert a peripheral IV as soon as possible. The IO needle should not remain in place for more than 24 hours.
Monitoring
- Colour of the limb.
- Position and fixation of the needle, patency of the IO, appearance of the insertion site.
- Presence of subcutaneous oedema, increasing limb size (extravasation).
- Time elapsed since placement.
6.2 Insertion sites
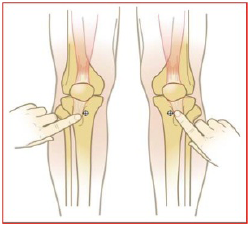
Proximal tibia
Insert the needle in the proximal tibia about 2 cm below the patella and on the flat surface located distal and medial to the tibial tuberosity (not on the tibial ridge).
OR
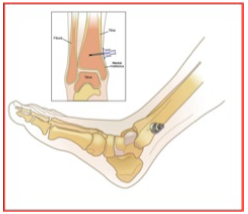
Distal tibial
The malleoli sites are approximately 3 cm proximal to the medial malleolus in the midline. Place a finger directly over the medial malleolus, move up to 3 cm, palpate the anterior and posterior edges of the tibia to make sure that the IO needle is inserted in the central portion where the bone is flat.
6.3 Method using a mechanical intraosseous insertion device
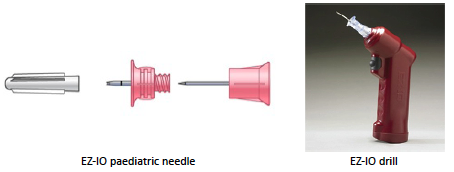
The EZ-IO is a battery powered medical drill fitted with a trocar and IO needle used to pierce the bone and insert the IO needle.
Equipment
- EZ-IO battery powered medical drill
- EZ-IO paediatric needle set, single-use, sterile, 15 mm, pink, 3 to < 40 kg
- EZ-infusion set extension, sterile, single-use
- Non-sterile, disposable gloves
- Sterile compresses, 10% povidone iodine
- 5 or 10 ml syringe of Ringer lactate
- Adhesive, sterile, single-use dressing
- Infusion set + Ringer lactate bag
Note: there are adult size needles which are not suitable for children under 40 kg. Do not use in children (increased risk of traumatic complications).
Insertion of the EZ-IO needle
1. Prepare the patient, stabilize the leg (e.g. using a rolled towel under the knee), in slight external rotation.
2. Determine the insertion site.
3. Wear disposable gloves (after hand-washing or disinfection with ABHR).
4. Disinfect the insertion site with 10% polyvidone iodine.
5. Open IO kit and needle’s sterile packaging, place needle on the EZ-IO drill.
Concurrently, prepare and flush the EZ-Connect extension tubing using a syringe (preferably a luer lock ie screw-top) filled with Ringer lactate.
6. Take the cap off the needle. Position the needle on the insertion site at 90° to the bone (perpendicular).
7. Start the drill by pressing the trigger. Proceed gently, do not use force. Stop the drill as the needle passes through the cortex and into the marrow cavity; there will be a «give» (release of resistance is felt).
8. With one hand, securely hold the needle in place. With the other, take the drill off of the needle, unscrew the stylet and connect the flushed extension tubing.
9. Check for a flash (small amount of blood) in the catheter to confirm the proper placement of the needle. If the flash is not seen proceed as in step 10 to check IO needle placement.
10. Confirm correct needle placement by injecting a rapid flush of 5 to 10 ml of Ringer lactate with a syringe. The rapid flush is essential. No flush = no flow. Repeat flush if the rate does not seem sufficient. If the IO needle is functional the flush should flow freely without excessive pressure on the syringe.
11. Secure the catheter (EZ sterile adhesive bandage or sterile gauze and adhesive tape). Beware of sudden movements, as for a peripheral IV.
12. Start the infusion.
13. Indicate the date and time of placement of the IO on the patient file. If available, also attach the IO identification bracelet (supplied with the IO kit) with date and time of placement of the IO needle.
14. Monitor the infusion at least every 15 minutes during the first hour.
If the attempt at IO needle placement is unsuccessful, remove the needle and try on the other leg.
IO needle removal
1. Stop infusion.
2. Wear disposable gloves (after hand-washing or disinfection with ABHR).
3. Remove the EZ stabilizer (fixation device).
4. Remove the extension tubing.
5. Fit a luer lock syringe to the IO needle and pull the needle out with a twisting motion. In the absence of luer lock syringe, unscrew by hand.
6. Dispose of the needle in a sharps container.
7. Disinfect the site with 10% polyvidone iodine.
8. Apply pressure to the insertion site for a few minutes if necessary.
9. Cover the insertion site with a sterile dressing (sterile gauze).
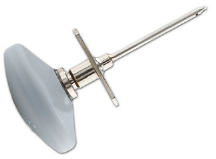
6.4 Manual insertion method
Equipment
- Sterile, disposable IO needle, 16G or 18G according to age and weight
- Non-sterile, disposable gloves
- Sterile compresses, 10% povidone iodine
- Syringe with 5 or 10 ml of Ringer lactate
- Adhesive, sterile, single-use dressing
- Infusion set + Ringer lactate bag
Insertion of the IO needle
The procedure is the same as when using a mechanical drill in terms of preparation, skin cleansing, patient positioning and verification of needle placement, flow and needle fixation, but:
- Grasp the needle in the palm of the hand, index and middle fingers approximately 2 cm from the tip.
- Insert the needle at 90° to the entry site using downward pressure and a twisting motion until resistance decreases as the needle passes through the cortex of the bone.
IO needle removal
As above when using the mechanical device but gently rotate the needle and remove it slowly.


