5.1.1 General recommendations
Personnel should wear personal protective equipment (gloves, goggles, clothing and eye protection) to prevent infection from blood and other body fluids.
Ensure a calm reassuring environment and provide the woman as much privacy as possible during examinations and delivery. Encourage her to move about freely if desired and to have a person of her choice to accompany her.
Anticipate the need for resuscitation at every birth. The necessary equipment should be ready at hand and ready for use.
5.1.2 Diagnosing the start of labour
- Onset of uterine contractions: intermittent, rhythmic pains accompanied by a hardening of the uterus, progressively increasing in strength and frequency;
And
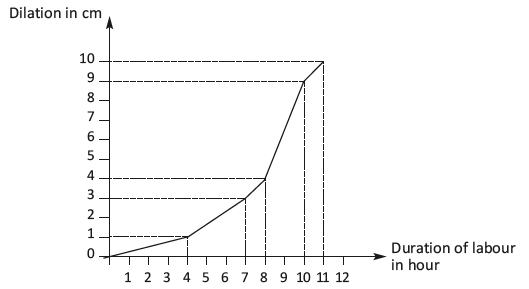
- Cervical changes: progressive shortening (effacement) and dilation (Figure 5.1):
- in a primipara, the cervix will first efface then, dilate;
- in a multipara, effacement and dilation occur simultaneously.
Repeated contractions without cervical changes should not be considered as the start of labour. Repeated contractions that are ineffective (unaccompanied by cervical changes) and irregular, which spontaneously stop and then possibly start up again, represent false labour. In this case, do not rupture the membranes, do not administer oxytocin.
Likewise, cervical dilation with few or no contractions should not be considered the start of labour. Multiparous women in particular may have a dilated cervix (up to 5 cm) at term before the onset of labour.
If in doubt, in both cases, re-examine 4 hours later. If the cervix has not changed labour has not begun and the woman does not need to be admitted to the delivery room.
5.1.3 Stages of labour
First stage: dilation and foetal descent, divided into 2 phases
1) Latent phase: from the start of labour to approximately 5 cm of dilation. Its duration varies depending on the number of prior deliveries.
2) Active phase: from approximately 5 cm to complete dilation[1]Citation 1.World Health Organization. WHO recommendations Intrapartum care for a positive childbirth experience, Geneva, 2018.
http://apps.who.int/iris/bitstream/handle/10665/272447/WHO-RHR-18.12-eng.pdf?ua=1 [Accessed 18 june 2018]. During this phase the cervix dilates faster than during the latent phase. The time to dilate varies with the number of previous deliveries. As a rule, it does not last longer than 10 hours in a multipara and 12 hours in a primipara.
Figure 5.1 - Dilation curve in the primipara (in a multipara, the curve is shifted to the left)
Second stage: delivery of the infant
Begins at full dilation.
Third stage: delivery of the placenta
See Chapter 8.
5.1.4 First stage: dilation and descent of the foetus
The indicators being monitored are noted on the partograph (Section 5.2).
Uterine contractions
- Contractions progressively increase in strength and frequency: sometimes 30 minutes apart early in labour; closer together (every 2 to 3 minutes) at the end of labour.
- A contraction can last up to a minute.
- The uterus should relax between contractions.
- Watch the shape of the uterus in order to spot a Bandl’s ring (Chapter 3, Section 3.3.2).
General condition of the patient
- Monitor the heart rate, blood pressure and temperature every 4 hours or more often in case of abnormality.
- Ask the woman to empty her bladder regularly (e.g. every 2 hours).
- Keep the woman hydrated (offer her water or tea).
- Encourage the woman to move about freely during labour. Position changes and walking around help relieve the pain, enhances the progress of labour and helps foetal descent. Pain can also be relieved by massage or hot or cold compresses. Midwife support helps manage pain.
- Routinely insert an IV line in the following situations: excessively large uterus (foetal macrosomia, multiple pregnancy or polyhydramnios), known anaemia and hypertension.
Foetal heart rate
Foetal heart rate monitoring
Use a Pinard stethoscope or foetal Doppler, every 30 minutes during the active phase and every 5 minutes during active second stage, or as often as possible. Listen to and count for at least one whole minute immediately after the contraction. Normal foetal heart rate is 110 to 160 beats per minute.
The foetal heart rate may slow down during a contraction. If it becomes completely normal again as soon as the uterus relaxes, there is probably no foetal distress.
If the foetal heart rate heard immediately after the end of a contraction is abnormal (less than 100 beats per minute or more than 180 beats per minute), continue foetal heart rate monitoring for the next 3 contractions to confirm the abnormality.
Management of abnormal foetal heart rate
- In all cases:
- Insert an IV line.
- Check maternal vital signs: heart rate, blood pressure and temperature.
- Check the uterine tonus. If hypertonic, look for excessive administration of oxytocin (which should therefore be stopped) or placental abruption (Chapter 3, Section 3.2).
- Check the colour of the amniotic fluid: meconium-stained (greenish) amniotic fluid combined with foetal heart rate abnormalities is suggestive of true foetal distress.
- If the foetal heart rate is less than 100 beats/minute:
- Stop administering oxytocin if an infusion is in progress.
- Check for vaginal bleeding: bleeding may suggest placental abruption or uterine rupture.
- Raise the patient or place her on her left side. Laying on her back the uterus creates pressure on the vena cava, which may be the cause of low foetal heart rate.
- Correct possible hypotension by fluid replacement (Ringer lactate) to bring the systolic blood pressure ≥ 90 mmHg.
- Perform a vaginal examination to look for cord prolapse.
- If the foetal heart rate is more than 180 beats/minute:
The most common cause is maternal febrile infection.
- Look for the cause of the infection (uterine infection, pyelonephritis, malaria, etc.) and treat.
- Treat the fever (paracetamol).
- In case of fever of unknown origin, administer antibiotics as for a prolonged rupture of membranes (Chapter 4, Section 4.9).
If the abnormal foetal heart rate persists or the amniotic fluid becomes stained with meconium, deliver quickly. If the cervix is fully dilated and the head engaged, perform instrumental delivery (vacuum extractor or forceps, depending on the operator’s skill and experience); otherwise consider caesarean section.
Dilation during active phase
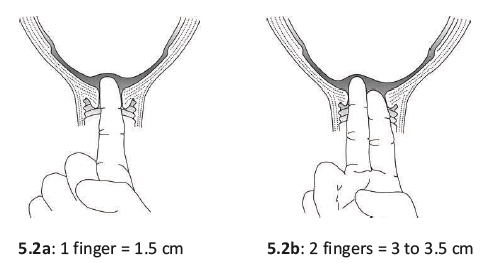
- The cervix should remain soft, and dilate progressively. Dilation should be checked by vaginal examination every 4 hours if there are no particular problems (Figures 5.2).
- No progress in cervical dilation between two vaginal examinations is a warning sign.
- Action must be taken if there is no progress for 4 hours: artificial rupture of membranes, administration of oxytocin, caesarean section, depending on the circumstances.
Figures 5.2 - Estimating cervical dilation
Amniotic sac
- The amniotic sac bulges during contractions and usually breaks spontaneously after 5 cm of dilation or at full dilation during delivery. Immediately after rupture, check the foetal heart rate and if necessary perform a vaginal examination in order to identify a potential prolapse of the umbilical cord (Section 5.4). Once the membranes are ruptured, always use sterile gloves for vaginal examination.
- Note the colour of the amniotic fluid: clear, blood-stained, or meconium-stained.
- Meconium staining by itself, without abnormal foetal heart rate, is not diagnostic of foetal distress, but does require closer monitoring—in particular, a vaginal examination every 2 hours. Action must be taken if dilation fails to progress after 2 hours.
Foetal progress
- Assess foetal descent by palpating the abdomen (portion of the foetal head felt above the symphysis pubis) before performing the vaginal examination.
- At each vaginal examination, in addition to dilation, check the presentation, the position and the degree of foetal descent.
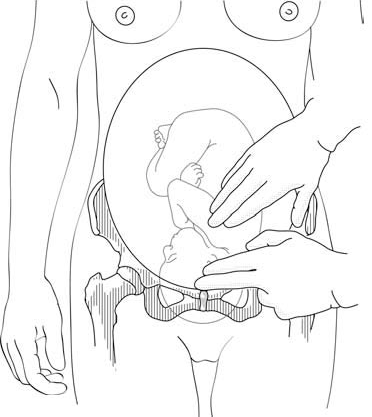
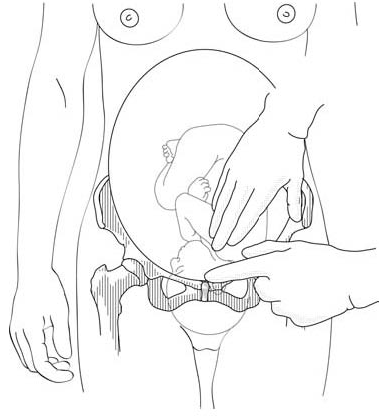
- Look for signs that the foetal head is engaged:
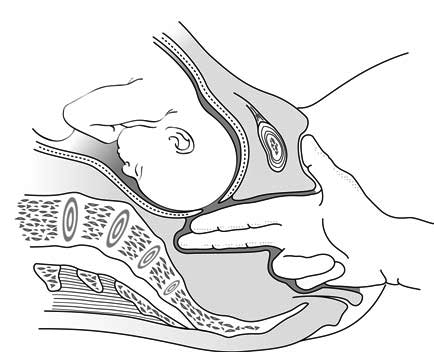
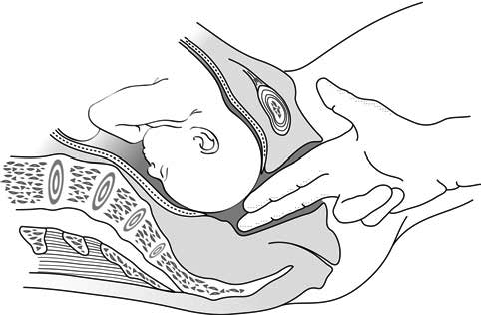
On vaginal examination, the presenting part prevents the examiner's fingers from reaching the sacral concavity (Figures 5.3a and 5.3b). The presence of caput (benign diffuse swelling of the foetal head) can lead to the mistaken conclusion that the foetal head is engaged.
The distance between the foetal shoulder and the upper edge of the symphysis pubis is less than 2 finger widths (Figures 5.3c and 5.3d).
| Figures 5.3 - Diagnosing engagement | |
|
5.3a - Presenting part not engaged: fingers in the vagina can reach the sacral concavity |
5.3b - Presenting part engaged: fingers in the vagina cannot reach the sacral concavity (if caput absent) |
|
5.3c - Head not engaged: the shoulder is more than 2 finger widths above the symphysis |
5.3d - Head engaged: the shoulder is less than 2 finger widths above the symphysis |
- Use reference points on the foetal skull to determine the position of the head in the mother's pelvis. It is easier to determine the position of the head after the membranes have ruptured, and the cervix is more than 5 cm dilated. When the head is well flexed, the anterior (diamond-shaped) fontanelle is not palpable; only the sagittal suture and the posterior (triangular) fontanelle are. The posterior fontanelle is the landmark for the foetal occiput, and thus helps give the foetal position. In most cases, once the head is engaged, rotation of the head within the pelvis brings the foetal occiput under the mother's symphysis, with the posterior fontanelle along the anterior midline.
5.1.5 Second stage: delivery of the infant
This stage is often rapid in a multipara, and slower in a primipara. It should not, however, take longer than 2 hours in a multipara and 3 hours in a primipara
If there is a traditional delivery position and no specific risk for the mother or child has been established, it is possible to assist a delivery in a woman on her back, on her left side, squatting or on all fours (Figures 5.4).
Figures 5.4 - Delivery position

- Rinse the vulva and perineum with clean water.
- The bladder should be emptied, naturally if possible. In cases of urinary retention only, insert a urinary catheter using sterile technique (sterile gloves; sterile, single use catheter).
- If labour is progressing well and there is no foetal heart rate abnormality, let the woman follow her own urge to push. In other cases, expulsive effort should be directed. The woman should push during the uterine contraction. Pushing may be done either with held breath (after a deep inhalation, glottis closed, abdominal muscles and diaphragm contracted, directed toward the perineum) or with exhalation. Expulsive effort is maintained for long as possible: in general, 2 to 3 pushes per contraction.
- Between contractions, the woman should rest and breathe deeply. The birth attendant should monitor the foetal heart rate after each contraction.
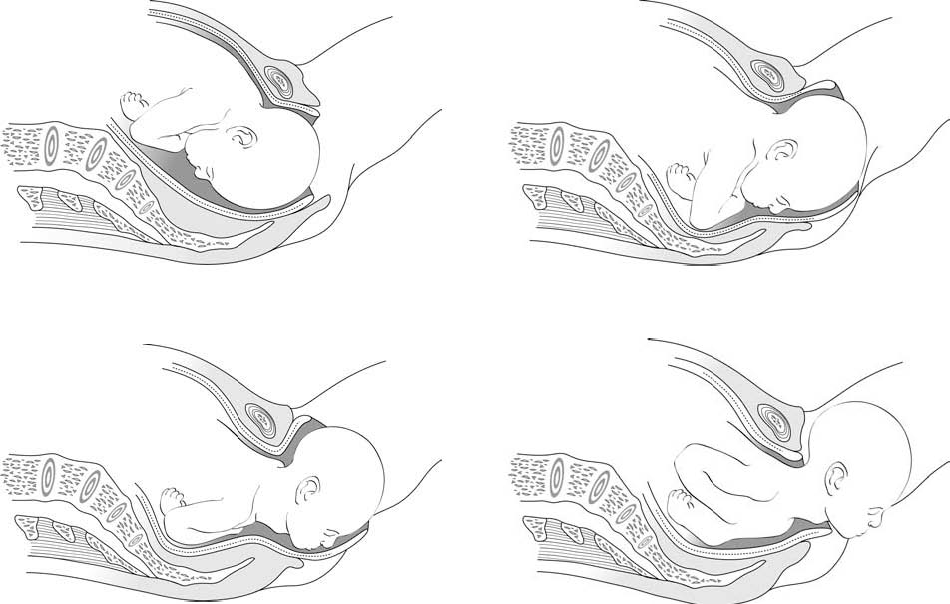
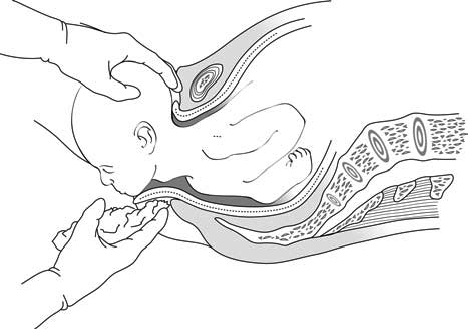
- The head begins to stretch the perineum, which becomes progressively thinner; the vaginal opening distends, the labia spread apart, and the occiput appears. In a cephalic presentation, the head usually emerges occiput anterior: the infant is born looking down, the occiput pivoting against the symphysis (Figures 5.5). The head goes into slight extension. The birth attendant must guide this motion and prevent any abrupt expulsive movement, with one hand supporting the occiput. The other hand can support the chin through the perineum. Cover the anal area with a compress (Figures 5.6).
Figures 5.5 - The different stages of occiput-anterior delivery
Figures 5.6 - Progressive delivery of the head
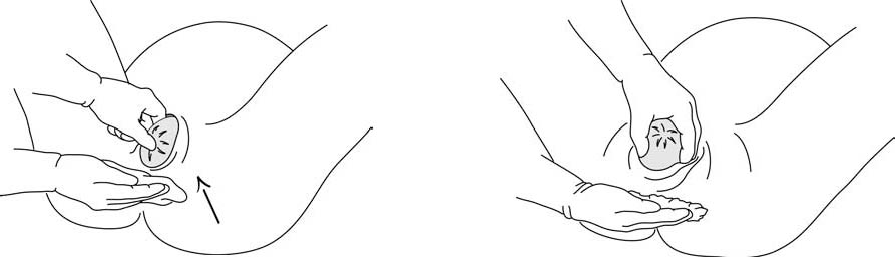
During this final phase—an active one for the birth attendant—the woman should stop all expulsive efforts and breathe deeply. With one hand, the birth attendant controls the extension of the head and moves it slightly side-to-side, in order to gradually free the parietal protuberances; if necessary (not routinely), the chin can be lifted with the other hand (Figure 5.7).
Figure 5.7 - Bringing the perineum under the chin
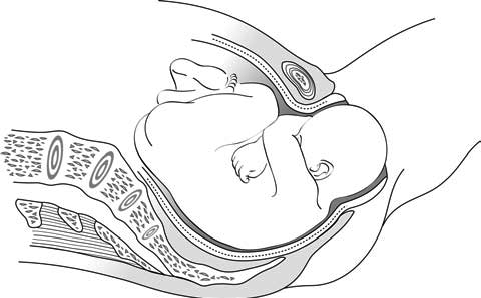
- At the moment of delivery, the perineum is extremely distended. Controlling the expulsion can help reduce the risk of a tear. Episiotomy (Section 5.8) is not routinely indicated. In an occiput-posterior delivery (Figure 5.8), where perineal distension is at a maximum, episiotomy may be helpful.
Figure 5.8 - Occiput-posterior delivery
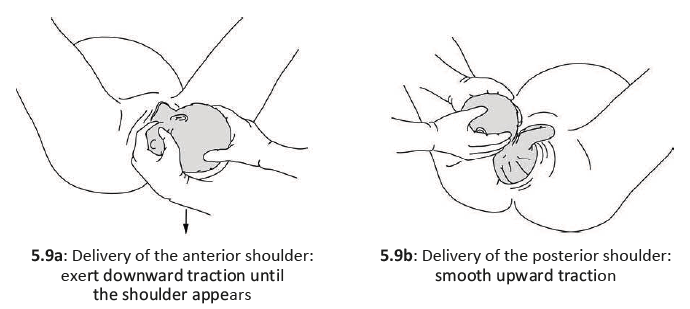
- The head, once delivered, rotates spontaneously by at least 90°. The birth attendant helps this movement by grasping the head in both hands and exerting gentle downward traction to bring the anterior shoulder under the symphysis and then deliver it then, smooth upward traction to deliver the posterior shoulder (Figures 5.9).
To reduce the risk of perineal tears, control the delivery of the posterior shoulder.
Figures 5.9 - Delivery of shoulders
- Place the neonate on mother's chest. For neonatal care, see Chapter 10, Section 10.1.
5.1.6 Oxytocin administration
Administer oxytocin to the mother immediately and then deliver the placenta (Chapter 8, Section 8.1.2).
5.1.7 Umbilical cord clamping
See Chapter 10, Section 10.1.1.
- 1.World Health Organization. WHO recommendations Intrapartum care for a positive childbirth experience, Geneva, 2018.
http://apps.who.int/iris/bitstream/handle/10665/272447/WHO-RHR-18.12-eng.pdf?ua=1 [Accessed 18 june 2018]